COVID-19 shuttered many of our favorite local and regional haunts for witnessing the spring migration of neotropical migrant bird species. Forced to bird from home, I finally set up a birdbath and water dripper, with delightful results.
Multiple factors are responsible for a great birding experience at home: appropriate habitat, water and food supplies, and location are all very important.1 During a pandemic in the middle of spring migration, the factor most easily changed and that might make the most dramatic difference in one’s birding experience might be how one supplies water to birds.
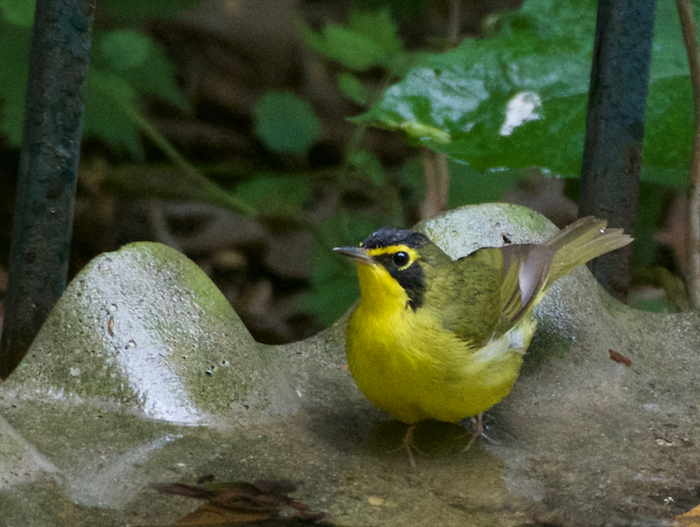 The skulking Kentucky Warbler is a gnome of dense woods, rarely showing itself this well.
Slow drips are so appealing to many songbirds that the baths and water drips installed in various oak mottes along the Upper Texas Coast are at least as much of an attraction as the rest of the reserves. However, it has been my experience, in such places, that I see many more birds by walking around than standing by at a drip. Additionally, under normal circumstances, I greatly prefer to hike to see birds, not having much patience for staying in one place for extended periods.
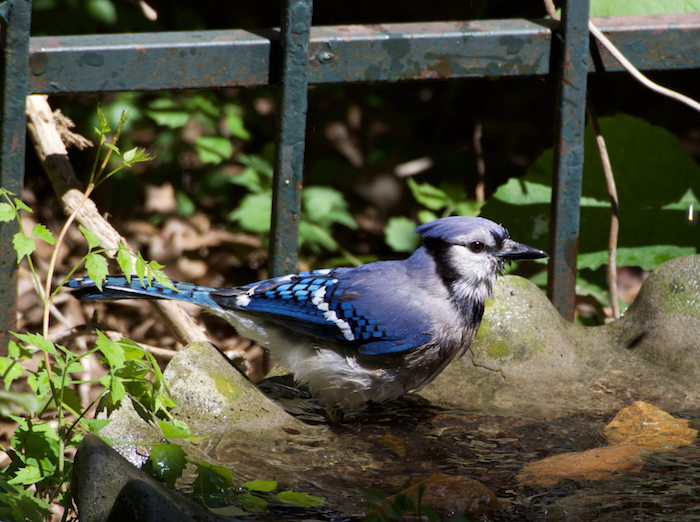 Blue jays are abundant here, but this is only the second time I’ve obtained a nice photograph of one.
Nevertheless, when natural areas are closed and there are stay-at-home orders in place, one of the most rewarding things a birder–or any nature enthusiast–can do is to optimize his home to assist migrant birds along their journeys to their breeding grounds. I already had feeders up, so my next step was to set up a birdbath and water dripper alongside the woods behind our home. Our regular birds–Northern Cardinals, Carolina Wrens, Blue Jays, and Carolina Chickadees–took to the bath pretty quickly.
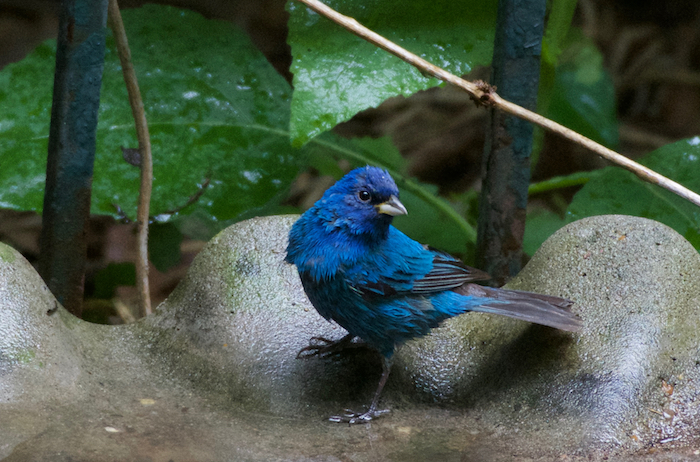 It’s not easy to get this close to the shy, skittish Indigo Bunting.
Within days, we had our first warblers, including an uncommon male Kentucky Warbler, and our first Indigo Buntings, both pictured above. In the several days our water feature has been in place, Tennessee Warblers, Chestnut-sided Warblers, Hooded Warblers, a Worm-eating Warbler, a Black-and-white Warbler, a brilliant male Blue-winged Warbler, and Gray Catbirds have also bathed there. Normally, we might see only one of these species, and only brief glimpses of them through dense canopy cover or thickets, but the birdbath has allowed us to carefully observe their behaviors over incredible lengths of time and to obtain decent photographs. I realized that I can reduce the minimum shutter speed and therefore the ISO in aperture priority, auto ISO mode when photographing birds at a drip, thereby increasing the quality of my photos. In contrast, when photographing small songbirds on a bird hike, I need a high shutter speed which results in many photos with fairly high ISO values, since many of these birds (warblers, especially) move constantly and prefer to hang out in shaded areas. (I cap the ISO at 3200 on my current DSLRs and do not use flash.)
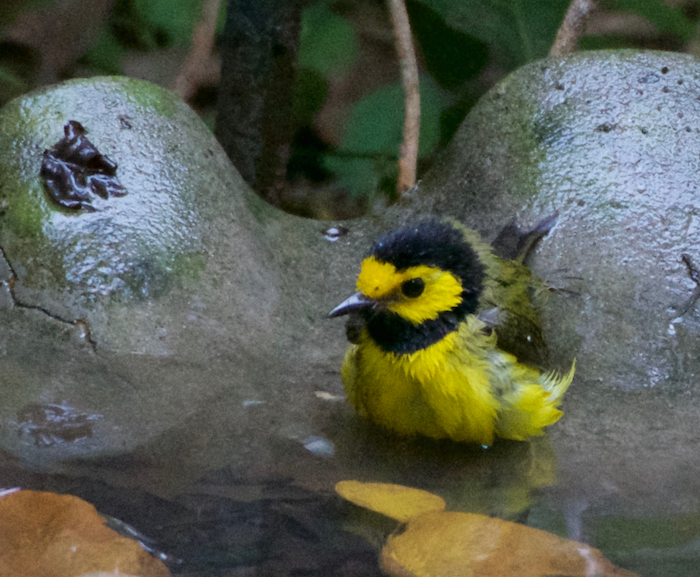 There were two male Hooded Warblers at our birdbath just moments before this photograph!
Once a steadfast birder who refused to get involved with serious bird photography, I’m surprised at how much of a photographer I’ve become over the past several years. Last year, I learned that some bird photographers use portable photo blinds, water drips, and birdbaths to obtain excellent photographs, particularly of songbirds that are otherwise difficult to see.2 My own experiences over the past several years proved to me that neotropical warblers are particularly difficult to photograph outside of a drip even in the best of times, such as during peak migration periods. I wanted to try this portable birdbath/dripper technique for myself, but preferred to go on long birding hikes with my camera instead, photographing whatever crossed my path that caught my eye.
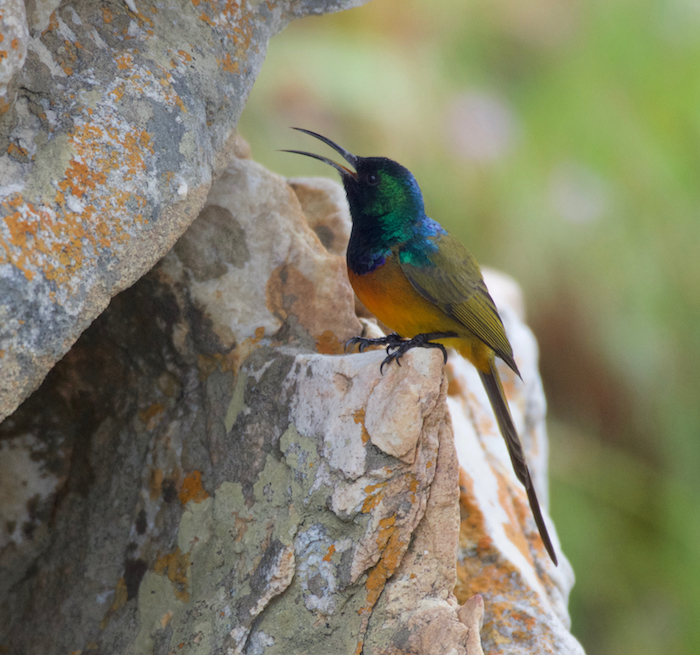 This Orange-breasted Sunbird, endemic to mountain fynbos habitat of the Western Cape of South Africa, flew to a natural rock formation after a light rain to drink from a transient water drip, enabling me to photograph it.
“Bird photographers have understood the magnetic properties of drips for years. Many of the most exquisite photographs gracing natural history magazines owe their existence to a cheap, plastic, water-filled bottle with a hole poked in the bottom left to dangle over a shallow tray in some vegetated place.” - Pete Dunne, Pete Dunne on Bird Watching, 2nd edition (2015)
The COVID-19 pandemic has me spending much of my free time at home, which catalyzed finally trying this out. There’s great advice online about setting up a birdbath, but I had to experiment a bit when setting up a makeshift portable water dripper from common materials for which I wouldn’t have to browse a hardware, gardening, or sports/outdoors store. (If you prefer a permanent dripper, you can use an outdoor faucet with attachments from specialty stores; see links at the end of this essay.)
My first prototype was a one-gallon plastic water bottle with a screw-on cap and a built-in plastic handle looped around the opening. I used a needle to create a pinhole at a corner along the bottom of the bottle. Unfortunately, the hole was a bit too large and resulted in a stream with the lid off or untightened, instead of a drip at the rate I desired. My solution was to partly tighten the lid, which helped for a while. However, the pressure would change inside the bottle and the drip would stop, which meant I had to fuss with the lid every so often. I soon realized that I need the air pressure inside the bottle to stay fairly constant.
My second design, which has been perfect so far, uses the same type of one-gallon plastic water bottle, but this time I created a TINY hole with a very thin (narrow gauge) needle, such that when the gallon was just barely filled with water (almost empty) and the lid was replaced without being tightened, the drip rate was about twenty drops/minute. When the bottle was full, the drip rate was about sixty drops/minute. A full bottle lasted for at least fourteen hours(!!) of hands-off, fuss-free drip time. This was all perfect, since the ideal drip rate range for attracting the kinds of birds I wanted to see–neotropical warblers–based on what I had read about them, is apparently anywhere between 20-60 drops/minute, and I didn’t want to refill or adjust the bottle multiple times a day. It worked, both in theory and in practice!
Here’s how to set everything up, from the birdbath to the dripper:
Set Up a Birdbath
- I found an old concrete birdbath that was not being used, but, according to the Cornell Lab of Ornithology, these are harder to clean than other options. They recommend using “a garbage can lid, a saucer-type snow sled, or even an old frying pan.”3 A plant pot base is another option. You can also use pond liner over “a shallow hole in the ground,” especially if you want to set up the bird bath/drip combination on the go.2 Since we don’t have many outdoor cats in our neighborhood, I took the Cornell Lab’s advice and put my birdbath on the ground, which is what birds prefer, according to them. If you’re worried about cats, “raise the bath two or three feet off the ground.”3 One resource recommends that the lining of the birdbath be of a dark color.4 Be sure to place the bath where you can see the birds but they don’t easily notice you.
- Other important points are that the bath should have a gentle slope down to the center, which should not be more than 1.5-2 inches deep.3,4 “A good birdbath mimics shallow puddles.”3
- Put flat, smooth stones or branches in the bath to provide places on which the birds can stand without getting wet.3
- The birdbath should be placed near perches (or perches should be placed near the bath), since birds will want to examine the bath before using it. Bird photographer Alan Murphy recommends setting up a few branches that lead down toward the bath.2
- If you have outdoor cats in your neighborhood, place the birdbath several feet (one source recommends 10-12 feet) from nearby shrubbery to avoid ambush by cats.3,4 We do not have an outdoor cat problem, so my birdbath is beside a metal fence with a forest behind the fence from which the birds enter the bath and where they seek shelter and preen after bathing. The area in front of the birdbath is wide open, allowing them to see and escape from predators (and photographers!) long before they approach.
- Clean the bath regularly. Replace the water every one or two days to prevent mosquitoes that carry West Nile virus from laying eggs that hatch.3
Create a Water Dripper
- Find an empty one-gallon plastic water bottle that has a built-in handle, preferably near the mouth/opening, so that the bottle is upright when dripping.
- Use a very thin needle (the tip might need to be heated with a candle or lighter flame) to make the smallest possible hole in a corner of the bottom of the bottle. Handle the needle attentively so that you don’t prick yourself. If you’re not sure that you’ve created a hole but do see a pinhole-sized mark where you pushed with the needle, then move on to step 3 anyway.
- Test the drip rate by putting enough tap water into the bottle so that it rises about 1-3 inches from the bottom. Keep the cap off for now. If the rate is greater than ten drops/minute (I recommend that it be approximately twenty drops/minute), you’re set. If not, then very carefully make the hole at the bottom a tiny bit wider and observe the drip rate again. Keep widening the pinhole until you’ve achieved your desired drip rate, whereupon you should move to step 4. If you only succeeded in making a pinhole depression in the plastic in step 2, patiently push the needle against the depression for a moment, then stop and look for water dripping. Keep doing this until water drips, then widen the pinhole until you’ve achieved your desired drip rate. Move to step 4. If you make the hole too big, water will stream out instead of dripping, the bottle will be ruined, and you’ll need to start again at step 1 with a new bottle.
- Fill the bottle completely and check the drip rate again. Sixty drops per minute is perfect, but it’s okay if the drip rate is a bit more or less than that. If water is streaming out, empty a fourth of the water in the bottle and check again. If water is still streaming instead of dripping, the hole is too big and you need to start over with a new bottle at step 1.
- Place the cap onto the mouth of the bottle and tighten it to stop the drip. Use a dark permanent marker to mark the corner with the hole for your own reference later, when refilling the bottle. Transport the bottle to your birdbath.
- Hang your new water dripper bottle a few feet over your birdbath (you might have to use an S-hook) and loosen the cap completely but keep it on the mouth to prevent debris from getting into the bottle and clogging the pinhole.
- Shortly after hanging the bottle, you might notice that water isn’t dripping or that the drip rate drops. If this happens, gently reinsert the needle in the hole you made earlier, then check the drip rate again. I’ve found that this usually establishes the desired drip rate and that the bottle doesn’t develop any further issues.
That’s all! This technique will give you a taste of spring migration. Remember that it’s more effective in hotter/drier climates and seasons.5 I haven’t yet used a portable photography blind, but I’m definitely considering it now!
UPDATE: We ended up seeing eleven warbler species and much more in the first eleven days our drip was active, including two–Wilson’s and Canada Warblers–that we didn’t see elsewhere this spring! Our dripper bottle lasted a long time: it functioned perfectly until the first week of August (longer than three months), through all kinds of weather, until a yard crew accidentally discarded it. We replaced it easily.
Featured image: a male Indigo Bunting in breeding plumage investigates our birdbath before taking the plunge.
All photos taken by the author with a Nikon D7200 and a Nikon 200-500mm f/5.6E ED AF-S VR lens.
References & Resources:
- The Basics of a Bird-Friendly Community, Houston Audubon Society, http://www.birdfriendlyhouston.org/get-started/the-basics/
- Murphy, Alan. “The Power of Water to Attract Birds.” Alan Murphy Photography, 13 Nov. 2009, http://www.alanmurphyphotography.com/The-Power-of-Water-to-Attract-Birds.pdf
- “Attract Birds with Birdbaths.” All About Birds, The Cornell Lab of Ornithology, https://www.allaboutbirds.org/news/attract-birds-with-birdbaths/
- Burtt, Ben. “Attracting Birds with Bird Baths and Dripping Water.” Keeping up with the Birds, 11 Jul. 2004, http://benburtt.blogspot.com/2004/07/attracting-birds-with-bird-baths-and.html
- Dunne, Pete. Pete Dunne on Bird Watching (2nd ed.). Stackpole Books, 2015. Print.
- Johnson, Terry W. “Moving Water Acts Like a Bird Magnet.” Out My Backdoor, Georgia Department of Natural Resources: Wildlife Resources Division, https://georgiawildlife.com/out-my-backdoor-moving-water-acts-bird-magnet
- “Food and Feeder Preferences of Common Feeder Birds.” Project FeederWatch, The Cornell Lab of Ornithology, https://feederwatch.org/learn/common-feeder-birds/
Last significant update: March 14, 2021.